Galinda "Popular" Robe Tutorial
- themakermage
- Feb 17, 2025
- 7 min read
I fell in love with this outfit as soon as I saw it in the movie. It's so silly and fluffy and pink! I made it in a bit of a rush because I really wanted to have a comfy Galinda outfit to wear at Katsucon, so my usual story/highlights posts on Instagram are pretty sparse and riddled with typos. Sorry, all.
So, I figured I'd try to make a much more useful writeup over here for anybody else who wants to make this insane garment. I'll be including specific links and quantities as well as a general writeup about the shapes/dimensions of the pattern. If this is at all helpful to you, please consider donating to my Kofi! None of these links are affiliate.

Materials
3 meters small dot net fabric in Bright Pink
62.2 meters (that's 68 yards) double layer mesh ruffle trim in Peach Pink (I accidentally slightly over-ordered, but towards the end I was nervous it wouldn't be enough!)
24 sheets of sticky dissolvable stabilizer. I used Sulky, it was probably overkill
RIT Dyemore Synthetic Dyes in Apricot Orange and Super Pink
Over 68 yards is BY FAR the most of anything I've ever ordered or needed.
Pattern
First and most important step: try to figure out the height of the hem circles on your body, proportionally. I cut out circles from paper bags and held them up to my body to try and replicate the proportions on Ariana. To me, it looks like they go from her calf to her ankle. On me, that ended up being 14". For reference, I'm 5'3". I do think my robe ended up being just a tiny bit shorter, but I'm ok with that because it's less trippy and draggy that way.
I was unsure how many circles are in the robe: 6 or 8? 6 would mean 3 on each side at front, side, and back. 8 would mean 4 on each side at front, side front, side back, and back. Staring at reference photos for a while convinced me that it's 8 circles total.

8 circles of 14" each means a hem circumference of 112 inches. If I were going to draft this pattern systematically, I'd probably draw 8 triangles that are as long as from the hem to the top of my head, with the bottom edge of each 14". Then I'd sew a mockup and play with pintucks and seams in order to make the circle fit my body before flaring out to the bottom hem.
That's not what I did, though. I used Simplicity 7964 as a base, because the bottom hem matched pretty well to my 14" circles, so I decided I liked that general shape of those pattern pieces and the angle of the V-neck.

There's a problem, though: this dress pattern is only 2 pieces, front and back! So I had to add 2 side panels on each side. That works out to a LOT of extra room under the arms. I removed some of that room with pintucks, but also moved the side seams WAY over towards the front and the back. Yes, I know if you've gotten this far, you are cringing hard at how I did this, but it worked eventually. And the shoulder circles hide any wonkiness (there wasn't actually that much wonkiness though).


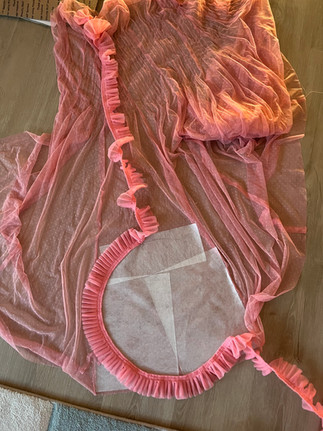
Here are my circle patterns: hem circles and shoulder circles.

Dyeing
Now, if you ordered the same fabrics I linked above, you'll notice that there are 2 issues:
They are not the same color as each other.
They are not the same color as the reference.

I'm not a great dyer and I don't have a lot of facilities, so I tried to keep my operation as simple as possible: I would only dye ONE of the materials, rather than trying to get both to match a third color. However, upon looking at my finished robe alongside some of the reference photos, I do think that the pink ruffle trim is really close already to some of the movie shots. Even though I was worried about it being slightly too orange and saturated, it reads as a lovely pink.

Using test scraps, I determined that I only needed 1 minute in 3 capfuls of orange to transform the light pink robe to a noticeably warm peach. I think I did 3 baths of 1 minute each, pulling the robe out and rinsing between baths to constantly check the level of dye uptake. Unfortunately, the 2nd bath was too light but the 3rd bath pushed it over the edge, so I ended up having to correct with a new, separate bath of 6 capfuls of Super Pink for several more 1-minute baths (again, pulling out and rinsing constantly in order to keep checking). I was very worried at this stage that my fabric would remain too orange, but thankfully the Super Pink sank in (slower than the orange!) and I got a great, honestly rather undeserved color match.

Spirals
Next up, the most time-consuming and frustrating part: stitching ruffles in large spirals directly onto the body of the dress. I stabilized the shit out of them using sticky dissolvable stabilizer and still had to very carefully manage tension while constantly rotating the fabric. Tips for this part:
Put down the stabilizer one spiral at a time. They do start peeling off after a while and the amount of MANAGING through the machine would certainly peel off any ones that are not currently being worked on.
Use pencil to trace your circle pattern onto the stabilizer. It's not fancy, it's visible, and it'll come right off when the stabilizer is dissolved.
Yes, dissolvable stabilizer is expensive, but I think it's worth it because I find it foolproof. That said, if you feel confident working with tearaway or other forms of stabilizer, go for it, you'll save money!


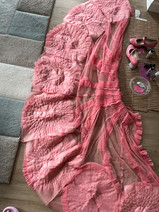


One thing that I don't have great pictures of, unfortunately, is that I stitched half the spirals in the opposite direction. 4 go clockwise, and 4 go counterclockwise. This is so I would be able to stitch down the "tails" that trail upwards with the correct orientation according to the reference.
I started from the top and the outside and worked toward the center of each spiral. Starting from the outside allowed me to lay each new layer on top of the previous, rather than trying to lift up the ruffles and then sew down the next layer underneath.
It turned out to be quicker to hand-stitch the centers of the spirals than manage the whole thing through very tight curves on my machine, so I did that.

Finally, I pinned the loose trailing "tails" and stitched them up the body of the robe towards the armholes and shoulder seams. Because they were pretty straight lines, I didn't need stabilizer for this part.
Speaking of stabilizer, I washed it all out! Hot water and a tiny soak, then agitate in your hands and finally rinse.
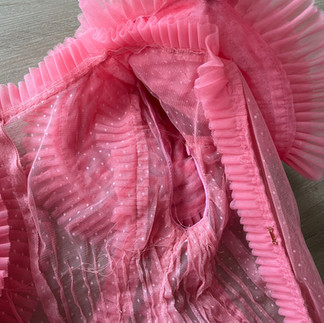
I finally trimmed the front edges of the robe with ruffle trim. This added the needed structure to keep the front opening from collapsing toward the sides and, of course, made the whole thing look a lot more finished. Because this dotted net doesn't fray, I didn't do any fancy bindings or even turn the edges over, and I think that worked out well because there was literally NO added bulk.
Shoulder spirals
Stitching the shoulder spirals was a huge relief compared to the hem spirals, because they could be worked on separately from the main body of the robe, which with all the hem circles is massive!

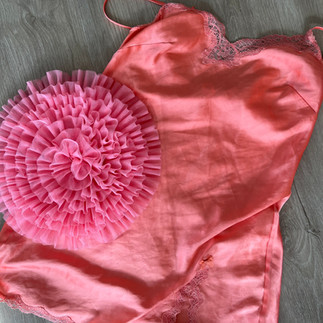
I finished the organza circles by smearing fabric glue onto the edges (didn't want any visible stitching or other types of hem finishes) and tacked them onto the robe.

Finishing
Because pins and stitching pull very easily out of this fabric, I used both knots and fabric glue on the back side to try and keep all my stitching in place, especially the hand sewing. Because of all the pintucks and the hand tacking, this took a while!
I bound the arm holes with bias tape.
I gathered 2 little rosettes for the back and spent way too much time trying to find my waist height and level that little ruffle in the back.
I used a single skirt hook and eye to close the front, and made one final ruffled circle to trim it.
The ruffle trim I used is quite wide; I used shears to trim the trailing-up tails on the body so they were narrower, a bit less flappy and in your face.
I machine-gathered the back waist to "cheat" a better fit toward the small of my back, and I also sewed in internal ribbon ties at the waist seams to bring the sides of the waist in.
I thrifted a Victoria's Secret nightgown to stand in as an underlayer while I consider how to approach creating a more accurate romper. I'm certain my somewhat slapdash process would not work on that particular garment. The thrifted nightie is noticeably the orange sort of "coral," which is not ideal, but it's close enough for an easy $18 find.

I hope to update with some nicer pictures from Katsucon in a bit, but for now here's what I've got!

Thanks for reading! Comment here or message me on Insta if you have any questions. If this was helpful to you, please consider donating to my Kofi or just giving me a follow on Instagram.
I can't wait to show off this look with full hair and makeup!


Comments